

![]()
![]()


configuration settings
how to find your IP address with win95/98
dialup networking
Windows 95/98:
add client for microsoft networks
add dial-up adapter
install dial-up networking
add TCP/IP
create a new dial-up networking connection
Common Problems and Error Messages:
"could not establish a compatible set of network protocols"
"computer is not receiving a response from the modem"
"password checkbox is greyed (unavailable)"
Windows NT
finding your IP address
configure dial-up networking
If you need further assistance with technical support, e-mail us your question(s) at: support@networkrichmond.com
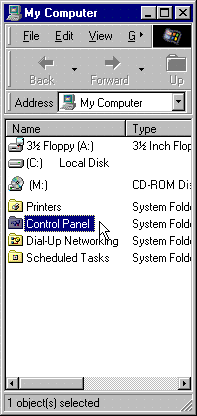
1. Microsoft Dial-up Networking must be installed with TCP/IP before you can connect to NetworkRichmond.Com or any other Internet Service Provider. To do this, locate the My Computer icon on your Desktop. Double-click on the My Computer icon.

2. A window similar to the one below will appear. Locate and Double-click the Control Panel icon.
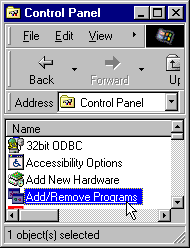
3. A window similar to the one below will appear. Double-click on the Add/Remove Programs icon.
4.
Click the Windows Setup tab.
5. Highlight Communications and choose the details box to see
what components are already installed.
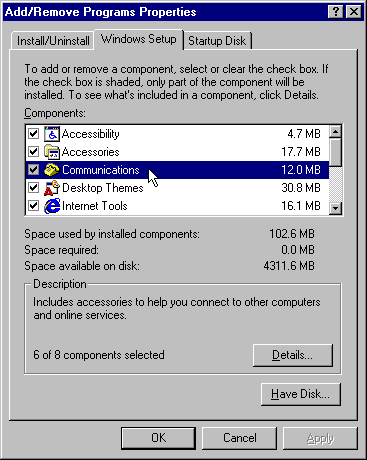
.
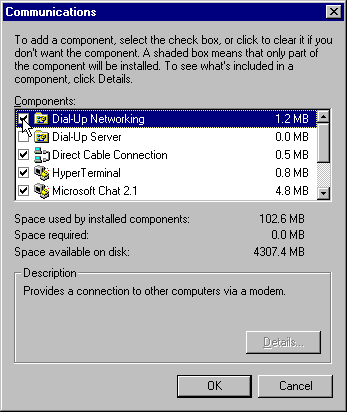
6. Locate the Dial-Up Networking option to see if a checkmark
appears in the box (as illustrated below). If a check is already in
the box, you may choose cancel and cancel again to exit the setup screen
as Dial-Up Networking is already setup. If no check appears in
the box, put a check in the box next to Dial-Up Networking.
7. Click the OK button to close this window.
8.
Click the OK button again to exit the Window setup box.
9. Windows 95 will prompt you for your installation diskettes or CD. If the installation files have been installed on your hard disk, you may have them in a directory with the path C:\windows\options\cabs. If not, you will need the CD or diskettes.
10. Several files will be installed. Wait for the Dial-Up Networking
installation to finish.
11.You will be asked if you wish to restart your system to activate the changes, click the OK button when any open files you may be using have been closed to prevent losing any of your work.
12. If your system does not automatically shut-down and restart, Click on the Start button, choose Shut Down and select Restart the computer.
13. Click the Yes button if asked.
14. Wait for Windows 95/98 to restart.
![]()
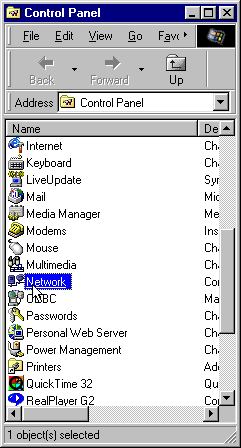
1.Your computer will communicate on the Internet using the TCP/IP protocol (Transmission Control Protocol / Internet Protocol). To install TCP/IP, click on the Start button, select Settings and choose Control Panel.

2. Click on the Network icon.
3. Select the Configuration tab which should come up automatically when the Network box is displayed.
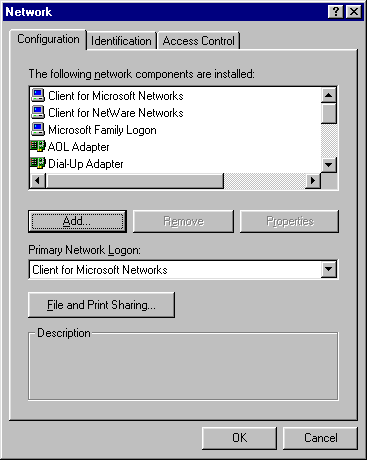
4.
Click the Add button to add a new component.
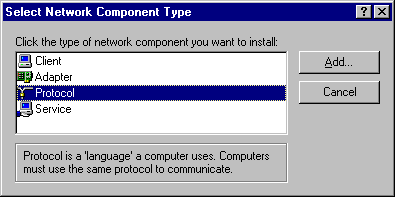
5. Select the Protocol option and click on the Add button.
6. From the Manufacturers list, locate and choose Microsoft.
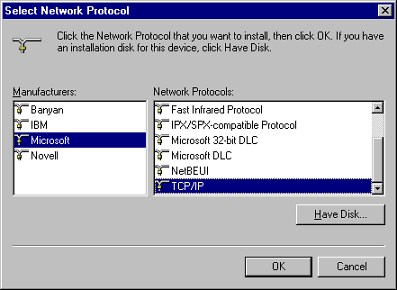
7. Several Network Protocols will appear in the box at right, as illustrated
by the above figure. Choose TCP/IP and click the OK button.
![]()
Create a New Dial-up Networking Connection
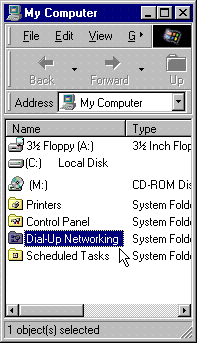
1. Microsoft Dial-up Networking must be installed before you can connect to NetworkRichmond.Com or any other Internet Service Provider. To do this, locate the My Computer icon on your Desktop. Double-click on the My Computer icon.
2. Double-click the Dial-Up Networking folder.
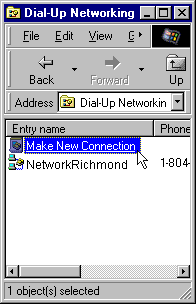
3. A window will open that has Make New Connection displayed as
the upper right icon or at the top of the list as illustrated below. There
may be other entries in this box. For now ignore them. We are going to
setup a new connection for NetworkRichmond.Com. Double-click the Make
New Connection icon.
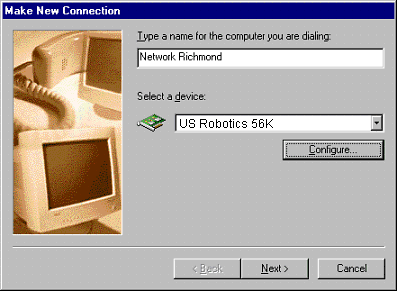
4. Under Type a name for the computer you are dialing, enter Network
Richmond and then check your modem settings by clicking on the Configure
button.
5.
Check that the appropriate speed is selected for your modem (for
14.4 modems use 19200, for 28.8 modems use 38400 and for 33.6 and 56K
modems, use 57600 or 115,000.)
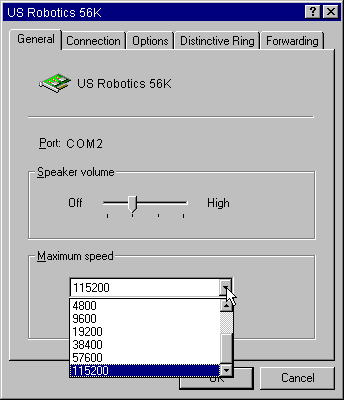
6.
Make sure that Only connect at this speed is not checked.
7. Click the OK button to return to the Make New Connection dialog box.
8. Click the Next button to continue setting up your new connection
for NetworkRichmond.Com.
9. In the Area code and Telephone number text boxes, type your local NetworkRichmond.Com access number. (IMPORTANT NOTE: Check with your local telephone company provider to make sure that the number you choose is a local toll-free call.
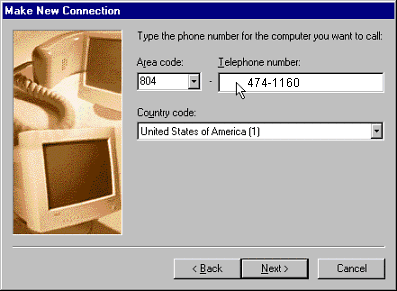
10. Click the Next button to leave this screen.
11.
When the screen below appear, Click the Finish button.

12. There should now be a Network Richmond icon in the Dial-up
Networking box. Highlight this icon. Click the right mouse button while
highlighting this option. Select the
Properties tab.
13. The information should appear similar to below. Locate the Server Type button in the lower portion of the screen and click on it.
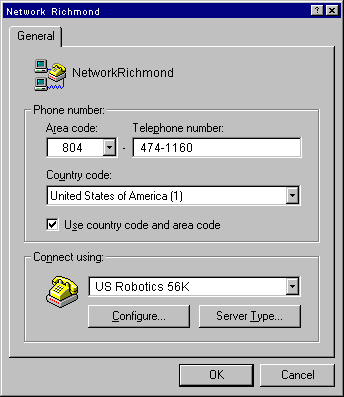
14. For Type of Dial-Up Server PPP: Windows 95, Windows NT 3.5,
Internet should be chosen. leave this setting as is.
15.
Verify that checkmarks are placed in the boxes for "Log on to network"
and "Enable software compression" as illustrated below.
16. Require encrypted password should not be checked.
17. Under "Allowed network protocols" in the lower portion of this window, place a check in the TCP/IP box only. Clear check marks from NetBEUI and IPX/SPX Compatible (as illustrated below).

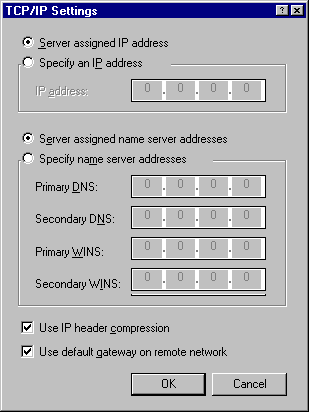
18. Click on the TCP/IP Settings button. A window similar to the one below should appear.
19. Select the Server assigned IP address button and Server assigned name server addresses button.
20.Check both Use IP header compression and Use default gateway
on remote network (these boxes should already have a check in them).
21.
Click the OK button to return to the Server Types box.
22.
Click the OK button to return to Dial-up properties.
23. Click the OK button to close the window.
![]()
hot news | suggestions | contact us | switchboard | search engines | home
Site
Created & Developed by:
Tech Knowledge Inc.
Creative
Technologies