

![]()
![]()


configuration settings
how to find your IP address with win95/98
dialup networking
Windows 95/98:
add client for microsoft networks
add dial-up adapter
install dial-up networking
add TCP/IP
create a new dial-up networking connection
Common Problems and Error Messages:
"could not establish a compatible set of network protocols"
"computer is not receiving a response from the modem"
"password checkbox is greyed (unavailable)"
Windows NT
finding your IP address
configure dial-up networking
If you need further assistance with technical support, e-mail us your question(s) at: support@networkrichmond.com
Common Problems and Error Messages
This is one of the most common issues on the Microsoft Windows support
lines, and almost always indicates that you either do not have Microsoft
Networking properly installed on your system, or that you entered the
wrong windows password or skipped the password when prompted.
If you properly logged in, or where not prompted to log in, use the following procedure to check your settings. Different version of Windows 95/98 slightly alter the steps in the following procedure, so please read your screen carefully.
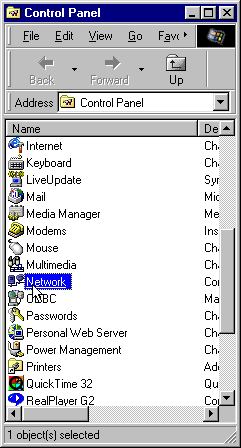
1. Click the Start locate Settings and choose Control Panel.

2. Double-click the Network icon.
3. When the Network window appears, ensure that you have at least the
Client for Microsoft Networks, Dial-Up Adapter, and TCP/IP installed
and properly configured as indicated earlier on this site. If any protocols
are missing, add them. Also please search through the list for TCP/IP
being listed more than once. If you have a network card installed, you
may see an entry similar to "TCP/IP --> Network Card Name".
This means that TCP/IP is bound to the network card. An entry of "TCP/IP
--> Dialup Adapter" means that TCP/IP is installed to the dialup
adapter. If you have an entry of "NetBEUI --> Dialup Adapter"
or "IPX/SPX Compatible --> Dialup Adapter", highlight and
remove them. Under normal applications you do not want to bind IPX/SPX
or NetBEUI to the dialup adapter. This could certainly cause the error
message above.
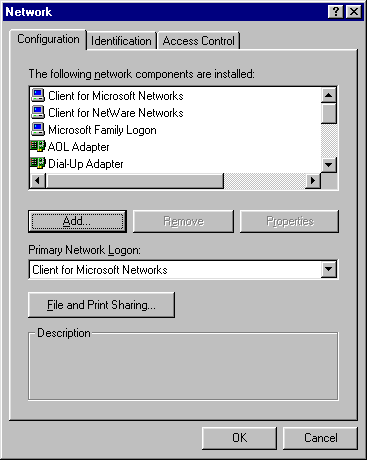
4. Ensure that Client for Microsoft Networks is properly installed.
5. If you make any changes, Windows 95 will prompt you for your installation diskettes or CD. If the installation files have been installed on your hard disk, you may have them in a directory with the path C:\windows\options\cabs. If not, you will need the CD or diskettes.
6. Several files will be installed. Wait for the Dial-Up Networking
installation to finish.
7. You will be asked if you wish to restart your system to activate the changes, click the OK button when any open files you may be using have been closed to prevent losing any of your work.
8. If your system does not automatically shut-down and restart, Click on the Start button, choose Shut Down and select Restart the computer.
9. Click the Yes button if asked.
10. Wait for Windows 95/98 to restart. This may take a few minutes.
11. When Windows 95 restarts, you may be prompted for a password. If you want to enter one, do so at this time, otherwise do enter a password. Click the OK button.
12. If you are prompted to confirm the new password, enter it if you gave it one or if not just click OK.
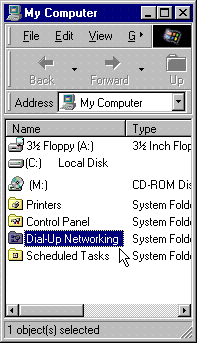
13. Once the desktop screed is up, locate and double-click the My Computer icon on your desktop.

14. Double-click the Dial-Up Networking icon.
15. Double-click the Network Richmond icon. If
the Save password option is no longer unavailable, enter a checkmark
in it (if desired). you must successfully connect to the Internet once
with the checkmark box checked before the password will be saved.
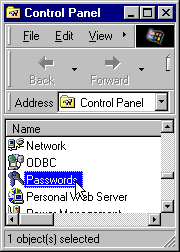
16. If the Save password box is still not available, click the Cancel button. and minimize the Dial-Up Networking window.
17. Locate the Passwords icon in the Control Panel window. and click on it.
18. If you have one, click the User Profiles tab. Some versions of Windows 95/98 do not have this option.
19. Click Users can customize their preferences and desktop settings and click the OK button.
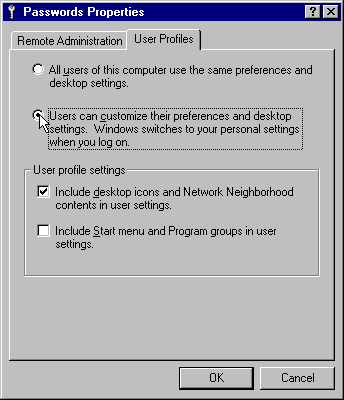
20. When asked, select Yes to let the computer restart. Wait
for the computer to reboot.
21.
When Windows 95 restarts, you may be prompted for a password. Enter
the password you chose or just click on OK if you did not choose one.
22.
If you are prompted to confirm the new password, type it and click OK.
23. Go to Start - Programs - Accessories - Dialup networking ( Start - Programs - Accessories - Communications - Dialup networking for Windows 98 users).
24. Double-click the Network Richmond icon and try to save password. If this does not work, you may have other problems with your system needing technical support.
![]()
Windows NT
Choose
START - RUN - and type command on the run line.
At the "DOS" prompt type ipconfig. Look for the PPP or NDISWAN
settings. One of these will be the IP address assigned to you by the dial-up
server.
Dial-up Networking:
Installing
1. From the desktop, double-click My Computer. Double-click Dial-up Networking. If you receive a message stating The phonebook is empty. Press O.K. to add an entry, skip to the next section, Creating a Dial-up Networking Connection.
2. If the Dial-up Networking window opens with the phonebook list and the option to dial, proceed to the next section to create a new connection. Click Install. You will be prompted to enter the path to your NT 4.0 setup files(for example D:\i386) and click OK. Windows NT should now install the necessary files onto the hard drive.
3. The Add RAS Device window will appear to add this device to the Network configuration. If you see your modem listed in the RAS Capable Devices field with a port attached, click OK and proceed to the next step .
4. If you do not see a modem listed, then you will need to install a driver for your modem. You should be able to do this by going to the Add RAS Device window, and choosing the Install Modem button. This will start the Install New Modem wizard. You can let Windows NT try to detect you modem automatically (recommended) by clicking Next. If Windows NT detects your modem, then proceed through the wizard. If Windows NT is unable to detect your modem, you will then have the option to select your modem from a list or use a disk provided by the manufacturer. You may need to follow the directions in your modem's documentation. Modems installed on as Digi-board for use with Multilink connections should be installed after the digi-board is installed.
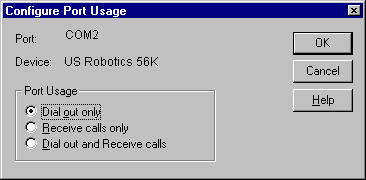
5. A window similar to the one below will appear. Highlight your modem and click the Configure button.
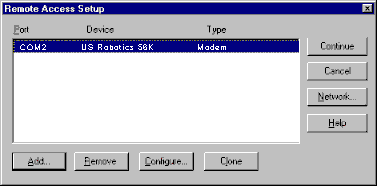
6. Make sure Dial Out Only is selected and click
OK.
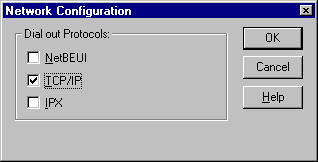
7. Click the Network button and ensure that TCP/IP is the
only box checked. Click OK if changes were made or Cancel
if no changes were made.
8. Click Continue in the Remote Access Setup window.
9. You will be prompted to reboot the computer before continuing.
![]()
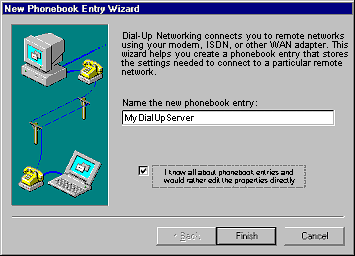
1.
From the desktop, double-click My Computer.
2.
Double-click Dial-up Networking. If you receive a message
stating that The phonebook is empty..., then click OK to add a
new entry. If Dial-up Networking (DUN) already has other
phone book entries, click New.
3. When the New Phonebook Entry Wizard window appears, check the box labeled I know all about phonebook entries... and click Finish.
4. In the New Phonebook Entry dialog, select the Basic tab.
5.
Check Use Telephony dialing properties and Uncheck Use another
port if busy.
6.
For Entry name, enter Network Richmond, and the access phone
number of 804 - 474-1160.
7. Under Dial using, select your modem.
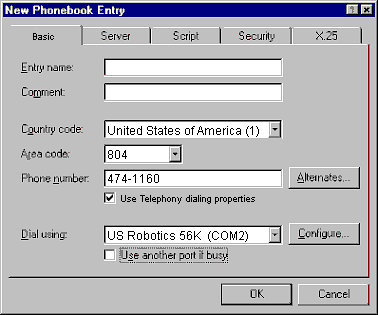
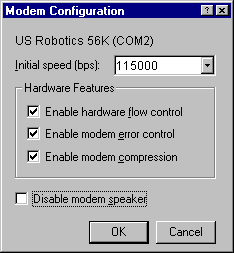
8. Click the Configure button.
9. Set the Initial speed (BPS) to 38,400 if you have a 28.8k modem, 57,600 for 33.6 modems and 115,000 for 56K modems
10. Make sure all three Hardware Features boxes are checked (if applicable) and that Disable modem speaker is not checked (unless you don't want to hear the modem dialing & connection answering). Click the OK button when completed.
11. Select the Server tab.
12. The Dial-up server type should be PPP: Windows NT, Windows 95 Plus, Internet. Under Network Protocols only TCP/IP should be checked.
13.
Make sure Enable software compression is checked, but Enable PPP
LCP extensions unchecked.
14.
Click the TCP/IP settings button. Select
Server assigned IP address and
Server assigned name server addresses.
15. Leave the Primary WINS and Secondary WINS servers at 0.0.0.0.
16. Check both Use IP header compression and Use default gateway on remote network.

17. Click the OK button.
18. Select the Script tab and make sure None is selected.

19. Select the Security tab. Choose Accept any authentication
including clear text.

20. On the New Phonebook Entry window, click OK.
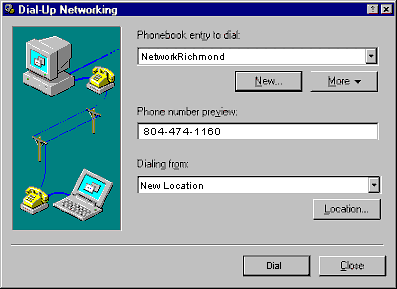
21.You
will now be in the Dial-up Networking program, and the phone book entry
you just created should be selected in the Phonebook entry to dial text
box.
22. Click the Dial button.
23. A window will appear asking for a username, password, and domain.
The first two are required. Do not enter anything for the Domain
- Leave this entry blank or you will be unable to log in. There is also
an option to Save Password, which can be selected if desired.
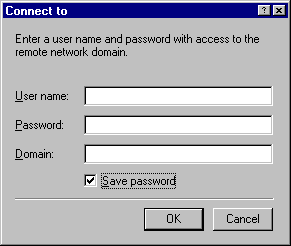
24. Click OK to dial into the Internet.
25.
Once you are connected, a window will appear informing you that you have
successfully connected to the Dial-up Server. Click OK to close
this window.
26. You are now connected and may use any internet software such as Internet Explorer 2.0 (installed with Windows NT).
![]()
hot news | suggestions | contact us | switchboard | search engines | home
Site
Created & Developed by:
Tech Knowledge Inc.
Creative
Technologies